Friday, July 13, 2012

The Farm

A few weeks ago we left our five bedroom, 3 bathroom, study and two living spaces to move to a 3 bedroom house.
Why? Because:
  1. The landlords put the house on the market without us being notified until months later when first we saw it advertised and then second a for sale sign was banged out front.
  2. The house was in need of some TLC and the landlords weren't prepared to come and do it. Whether they were too busy or it wasn't a priority I'm not sure but it didn't help us.
  3. It was cold! Seriously it was colder inside than it was outside. Great in summer, not great in winter.
  4. My health has been under some serious testing these last few months. Constant migraines and absolutely no energy are just the tip of the symptom iceberg and I just couldn't cope with up keeping a house of the size any more.
So we have down sized and country lifestyles instead. We now have a far more manageable house size and around 3 acres of land - which is so in my dream world of sheep, chickens, pigs, cows, ducks, dogs etc, etc.

I am totally smitten by peace and quite and fresh air. I said to Bubba the other day that life is just to great here to go back to city. I actually don't think I could handle it anymore. I was so made and designed for the country lifestyle. I can't wait to get our animals and gardens happening and enjoy the fruit of our hard work out here.


I have been through numerous tests and am ongoing multiple testing for my health at the moment. I have had upteen blood tests to test for everything under the sun and have started down the path of CT and MRI scans to rule out, or find, anything that is affecting my brain.

My CT came back clear which is a relief but my doctor is amazing and is doing everything he can to get to the bottom of my health concerns so that I can get back to enjoying a normal life. I am still awaiting my MRI results as I have only just been to the John Hunter hospital to have these done.

It is so nice to sit out in the sun and enjoy our new views as I try and escape what has become my normal for now. I try to do every day with as much smile and as much energy as my body will permit me as there is no point sitting around crying and feeling sorry for myself.

Most people wont even know the load I deal with daily as I'm not one to moan about my circumstances when I know there are others out there dealing with their own stuff and often much more.


The rural church that is in front of our property.


We are blessed with an abundance of fruit trees at the farm. We have oranges, lemons, limes, apple, apricots, grapes and passionfruit that I can so far identify. We are looking forward to getting our own vegetable and herb gardens up and running and enjoying the freshness of home grown.

Another biggy that I am trying out at the farm is to eliminate as many chemicals from our lives as possible. One of the reasons I am having so many tests right now is to rule out any serious illness or life threaten diseases before we move onto the path of environmental.

After doing a lot of research, thanks to a good friend over here who dealt with very similar symptoms and lack of enjoyable life, we are looking at a possibility of Multiple Chemical Sensitivity which will usually lead to Chronic Fatigue. There is a very good reason to believe that all the hype around the Paritutu Dioxin Dump in New Plymouth, New Zealand, is a little more true than the so called "government research" would say ( You can read more here and here to get a better picture). This would account for a Mutliple Chemical Sensitivity and why I never had migraines, among other symptoms, until the last three to four years when I moved into a property in this area.

We are very glad to have found somewhere that we can be chemical free and have found an amazing doctor who is open to working with an environment specialist to work through this, providing that the can't find any other medical reason for my symptoms.


So for now we will keep working on why I have the symptoms I do and hope to get to the bottom of it but we are doing everything in our power to try and eliminate the stress that my mind and body are under.
So welcome to our farm and we hope to be a little more chemical free and self sufficient everyday that we are learning more about how to go about it. 

Tuesday, July 10, 2012

Tuesday Tutorial - Crochet grannys part 2 learning to square


With the completion of Jaybugs granny blankie. I thought I would start a Tuesday tutorial for my squares and the way I border joined them. Part 1 is here - a few tips and beginners readings.

Part 2
I want to give a pictorial of my square pattern I used, please remember this is my first crochet how-to and it may be a little less professional than other online ones....

I used US crochet terms so if you use UK you may find it helpful to look at a crochet stitch conversion chart. If you are new to crochet knowing that there are US and UK terms is something worth knowing - that I didn't know for a few months into my learning to crochet and I couldn't work out why somethings worked and some didn't!


CH - chain stitch

SL - slip stitch
SC - single crochet
DC - double crochet

With a 4mm crochet hook and 8ply yarn:

 Start with a slip stitch
ch 4


 join with a sl to first ch to make a ring.
(As pictured)
ROUND 1:
ch 3 (counts as first dc), then dc twice into ring (makes 3 dc group as pictured)

ch 3 (makes corner)


3dc into ring, 3ch. 3 times


 Join last 3ch to 3rd ch of first 3ch with sl to join the round. (As pictured)

(you will now have 4 groups of 3dc and 4 3ch corners)
ROUND 2:
3ch (counts as first dc) 2dc 3ch 3dc into 3ch corner space.


*3dc 3ch 3dc into 3ch corner space 1ch** repeat from * to ** 2 more times

Join last ch to 3rd ch of first dc with a sl to join round.(as pictured)

ROUND 3:
3ch 2dc 3ch 3dc into 3ch corner space.


1ch 3dc into 1ch space of round 2 (as pictured) 1ch.

*3dc 3ch 3dc in corner space, 1ch, 3dc in 1ch space, 1ch**

Repeat * to ** twice more

Join round with sl to 3rd ch of 1st dc (as pictured)

Here I am going to show you how to change colour.

Remove hook and pull yarn tight through stitch to fasten off. (as pictured)


Take new colour and make a sl
slip sl onto hook (as pictured)

NB. if using one colour just continue from join to 3ch as first dc.

Join with sl to any corner space. (as pictured)

ROUND 4
3ch 2dc 3ch 3dc into corner space, 1ch, 3dc into space, 1ch, 3dc into space 1ch.

*3dc 3ch 3dc into corner space, 1ch, 3dc into space, 1ch, 3dc into space 1 ch**

* to ** repeat twice more


Join round with sl to 3rd ch of 1st dc.


You can make as many rounds as you like by 3dc 3ch 3dc in every corner and 3dc in every 1ch space of previous rounds.
Add 1ch between every corner group of 3dc group of stitches.

i.e. ROUND 5:
3ch 2dc 3ch 3dc into corner, (1ch, 3dc into space) 3 times 1ch.
*3dc 3ch 3dc into corner, ( 1ch, 3dc into space)1ch** * to ** twice more.
Join with sl to first dc.

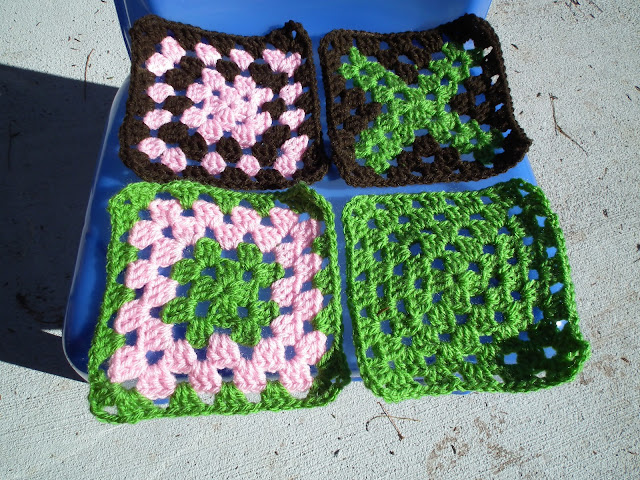
Here are some of the different colour combinations I used to make different patterns.


Happy hooking everyone and please let me know if you have any questions or want some clarification on any of my explanation.

edit: If you are completely new to crochet I have most likely been of no help at all and you will find much more benefit here at Meet me at Mikes.  

See you next Tuesday for part 3 - how I border joined my granny squares.

Friday, July 6, 2012

Russian Fudge - Fast and Easy

I think Russian fudge is wonderful, delectable, marvelous and positively scrumptious, but it takes a long time of delicately stirring and gently boiling to get this amazing fudge. It is a work of art that takes the right person with the right touch to get Russian fudge just right.


I tried to develop different methods for passing the tedious thirty minutes of standing in front of the stove (although some husbands have been known to say this is the rightful place of a wife!)
I have tried my favourite CD to listen to, movie or TV drama but it is still thirty minutes of standing and hoping that you get it just right.

So I thought there must be a better way??
And I found it!

The microwave....

Here is my recipe for Microwave Russian fudge:

The first thing is a LARGE bowl or jug - I used to use a pyrex 2 litre jug but now I use the bottom of my Tupperware stack cooker (3 litre) and lid.

3 cups white sugar
1/2 tin condensed milk
125g butter
1 tsp vanilla
1/2 cup milk
1 Tablespoon golden syrup
pinch of salt

  1. Place all ingredients into a LARGE microwave bowl.
  2. Stir to mix and cook on high (I do 80% for my Tupperware bowl) for 12-15 minutes stirring every 3 minutes, So I just do 3 minutes stir, another 3 minutes etc, until it is golden and thickening.
  3. Beat with electric beaters until thick.
  4. Pour into a well greased slice of square pan.
  5. Set aside to cool and set - if the temp is warm pop it in the fridge.
And voila! Russian fudge in no time at all!


WARNING! Russian Fudge is highly delicious and you may be caught eating far more than you should....

Tuesday, July 3, 2012

Tuesday Tutorial - Crochet for beginners granny blanket part 1

I finally finished Jaybugs granny square blanket. I remember blogging about it here in February and saying that it would be finished in no time. But my problem is I get distracted. I tend to have about 10 projects that are either on the go or in my head begging me to make them....

With moving two weeks ago I made myself promise myself that I wouldn't touch or think (too much) about another project until the blanket was finished. And whatta know?? I did it!, I finished - finally!


For the blanket:
I used Moda Vera Marvel Plain 8ply yarn (from Spotlight). It comes in lots of great colours and I have used 6 colours in this blanket. I think I used between two and three balls of each colour in the end so roughly 15 balls of yarn.

The blanket size is 10x11 or 110 squares - this fits Jaybugs single bed which is what I wanted.

A 4mm crochet hook (or a 6 in USA and 8 in UK)

Please note I crochet in US terms as it seems to be mostly what I find online and it also seems to make sense with the stitches and stitch names.
Here is a crochet stitch conversion chart to make it a bit easier.

Abbrev
American
Abbrev
English
ch chain ch chain
slip st slip stitch sl st slip stitch
sc single crochet dc double crochet
hdc half double crochet htr half treble
dc double crochet tr treble
tr
trc
treble
triple crochet
dtr double treble
dtr
dtrc
double treble
double triple crochet
triptr triple treble
trip tr
tr trc
triple treble
triple triple crochet
quadtr quadruple treble

Before I start with my square pattern and then how I joined them using a border I will give you some good resources I use. Stitch instruction for complete beginners can be found in lots of place online or in crochet books.

Some good online rescources:
Crochet Australia here - they also have left handed instructions if you need them
Crochet for Dummies here
Crochet Dictionary here
Crochet How-to the basic stitches here
and there are plenty of others out there if you search for them.

There are heaps of great videos links on Youtube for beginners here

And a few good blogs I read
And many more....

A few good beginners books in my crochet library are:
200 Crochet Blocks by Jan Eaton
Hooked on Crochet! Hats by Annis Attic
Amigurumi World by Ana Paula Rimoli
Note: All the links are to the book depository as this is the site I personally use for my book purchases but you could find these titles any where you like.

And my favourite resource of all is Ravelry for crochet and knitting. Here there are patterns, ideas, forums, yarn suggestions, an online project library and so much more

So I will leave you will a whole lot of reading and searching but will be back with part 2 and part 3 soon.


Monday, July 2, 2012

Looking for joy - I'm Farming and I grow it

With three children all up overnight and sick I need a bit of joy in my day and I thought I would share it as it might make you smile too.

This is our families new anthem as this is our new lifestyle on the land.


Gotta love parody music!

Sunday, July 1, 2012

Winter warmers - homemade soup

Today I decided to make soup for our mild winters day. It turned out incredibly delectable and I thought I would share my recipe - while I still remember what I threw in the pot!

Chunky and Hearty Soup

2 venison shanks (you could substitute these with 4 lamb shanks.)
3 medium carrots, chopped coarsely
2 brown onions, chopped coarsely
2-4 cloves of garlic, crushed
2 medium potatoes, chopped coarsely
1 medium sweet potato or kumara, chopped coarsely
2 celery stalks, trimmed, chopped coarsely
400g tin of chopped tomatoes
1 litre (4 cups) of beef stock
500ml (2 cups) of chicken stock
1/2 cup of tomato paste
A shake of each, dried rosemary, oregano and thyme.

1. Place all ingredients in large saucepan; bring to the boil; reduce heat and simmer, covered for 1.5-2 hours, or until shanks are tender.
2. Remove shanks from soup. When cool enough remove meat from bones, discard bones. Return meat to soup, stir until hot, season to taste.
3. Serve soup warm with your favourite bread for extra heartiness.

Easy and tastes great. This soup is full of rich and deep flavour that will leave you wanting more. What better way to warm a day and get a healthy serving of vegetables and meat.